Page 2 of 3
Re: KX500 AF Build
Posted: Tue Sep 15, 2015 4:10 pm
by Sandblaster
Sometimes you need to soak them several times and let them sit overnight.
I always try to free them up enough by hand but sometimes this just isn't enough.
The next thing I do is get a shop rag and put it over the end of one of the exposed shafts at the bottom of the valve.

- OEM-CYCLE.COM STICKY EXHAUST VALVE REMOVAL 104.JPG (61.1 KiB) Viewed 9980 times
Then I use my trusty Slide grips and lock onto the small exposed shaft.
DO NOT grip them too tightly as you can damage the shaft.

- OEM-CYCLE.COM STICKY EXHAUST VALVE REMOVAL 105.JPG (109.38 KiB) Viewed 9978 times

- OEM-CYCLE.COM STICKY EXHAUST VALVE REMOVAL 106.JPG (55.85 KiB) Viewed 9978 times
Then I gently tap them out about 1/4 to 3/8 of an inch or 6-10mm and they will stop.
Next I slide the main shaft out.
Then the valves should come the rest of the way out.
Re: KX500 AF Build
Posted: Tue Sep 15, 2015 4:15 pm
by Sandblaster
Some day I will do a complete write up on the valves.
There is a lot there to discuss for modifications and making them better.
Re: KX500 AF Build
Posted: Tue Sep 15, 2015 4:17 pm
by jacquedup
Thank you. Will give it a try.
I also found a few cracks in my cylinder that needs repair.
Re: KX500 AF Build
Posted: Tue Sep 15, 2015 4:26 pm
by Sandblaster
Yeah... it is very common to find cracks in the cylinder

Just a thought... If your main seals have not been replaced in the last 5 years or so, they probably need to be replaced...
Not always but a lot of times they leak air which makes them impossible to correctly tune and you run the risk of running the engine lean which is never good

The bad thing is you have to split the cases to do it.
If your careful you can split the cases without removing the transmission.
Then again, if you go that far I would look at replacing as a minimum the output shaft bearing next to the sprocket...
But hey, why stop there?
Replace all the bearings

Re: KX500 AF Build
Posted: Tue Sep 15, 2015 5:31 pm
by jacquedup
I suppose for the effort and money in the long run it will be a lot better to split the cases, and make sure everything is 100%.
Not that much more money, especially that the crank seems good. Just more effort. Will sleep on it tonight.

Re: KX500 AF Build
Posted: Wed Sep 16, 2015 6:18 pm
by jacquedup
ok, so I think I am going to split the motor, just for that extra peace of mind.
I took the sleeve to a engineering shop today and they said I need to strip everything out. even the head bolts.
But what I would like to know is. They say that they sandblast the head on the outside which gives it a rough finish. I have seen in some of the other engine builds that the casings goes in for plating. What plating is it? I would love the engine to look brand new when done.
Re: KX500 AF Build
Posted: Wed Sep 16, 2015 8:54 pm
by Sandblaster
Are you asking about the engine cases, the cylinder, or the head?
Re: KX500 AF Build
Posted: Thu Sep 17, 2015 12:29 am
by jacquedup
The outside of the motor. So cases on the outside, sleeve gets nikasil on the inside but when i get it back the outside will be sandblasted. So do i leave it like that or what needs to be done? And then the head on the outside.
When i am done i would like the motor to look brand spanking new.
Re: KX500 AF Build
Posted: Thu Sep 17, 2015 1:34 am
by Sandblaster
Ok, got it.
You may have noticed some of our engine builds..

We use a Vapor Blaster to get ours this clean.
It is also called wet blasting, aqua blasting, and a few others.
No other process will make your parts look this good.
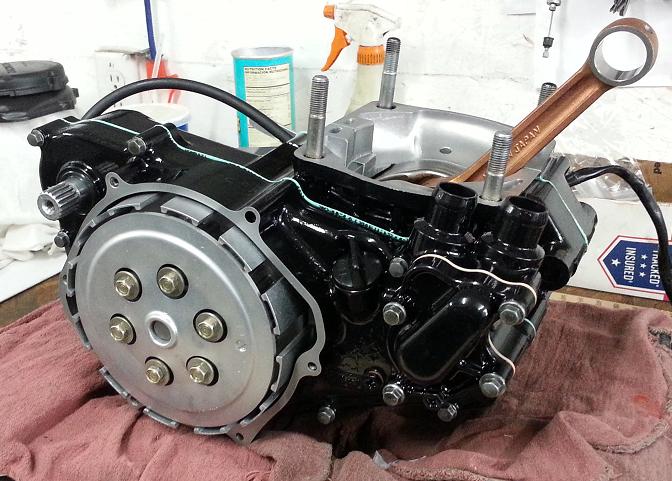

If you lived a bit closer I would tell you to send in your parts
Re: KX500 AF Build
Posted: Thu Sep 17, 2015 1:43 am
by jacquedup
So it doesn't actually get coated with something it is just vapour blasted?