Page 1 of 3
KX500 BOTTOM END ASSEMBLY
Posted: Thu Apr 17, 2014 10:34 pm
by Sandblaster
KX500 BOTTOM END ASSEMBLY
All new bearings, snap rings, seals, and gaskets.

- KX500 ORGANIZING THE PARTS.JPG (88.4 KiB) Viewed 14181 times
Off with all those old snap rings...

- KX500 ORGANIZING THE PARTS 1.JPG (92.18 KiB) Viewed 14181 times
Re: KX500 BOTTOM END ASSEMBLY
Posted: Thu Apr 17, 2014 10:36 pm
by Sandblaster
New snap rings installed.

- KX500 ORGANIZING THE PARTS 2.JPG (107.49 KiB) Viewed 14180 times
Crank in the freezer.

- KX500 ORGANIZING THE PARTS 3.JPG (50.86 KiB) Viewed 14180 times
Re: KX500 BOTTOM END ASSEMBLY
Posted: Fri Apr 18, 2014 1:36 am
by Sandblaster
Installing all new bearings and seals..

- KX500 ORGANIZING THE PARTS 4.JPG (54.93 KiB) Viewed 14178 times
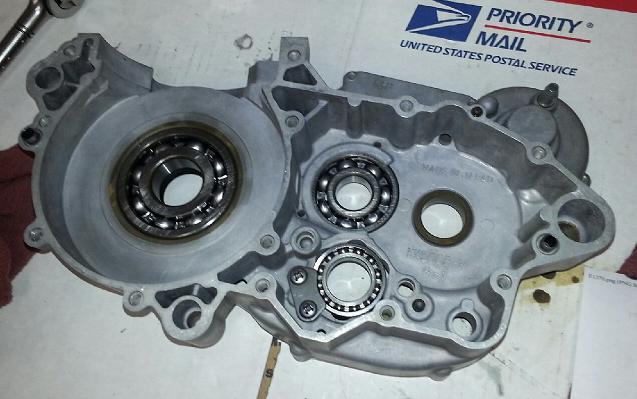
1 case half ready for assembly

- KX500 ORGANIZING THE PARTS 5.JPG (66.23 KiB) Viewed 14178 times
Re: KX500 BOTTOM END ASSEMBLY
Posted: Fri Apr 18, 2014 6:23 pm
by Sandblaster
Here's a small diversion about snap rings.
Ever notice how after you expand your snap rings sometimes they feel a little loose on the shaft?
You can be as careful as you can when installing them and they just loose a little of their spring..
Here's a way to make them tight again.
I should start a "Tips by Motorrad" section as this is another great Motorrad suggestion.
After I assembled my trans yesterday Motorrad sends me this...

- motorrad method.jpg (19.03 KiB) Viewed 14175 times
Re: KX500 BOTTOM END ASSEMBLY
Posted: Fri Apr 18, 2014 7:00 pm
by Sandblaster
See how one side is worn smooth while the other side remains sharp?

- SNAP RING INSTALLATION MOTORRAD METHOD 1.JPG (28.17 KiB) Viewed 14175 times

- SNAP RING INSTALLATION MOTORRAD METHOD 2.JPG (28.93 KiB) Viewed 14175 times
I say again.. replace them all.
Getting back to Motorrads tip... to test this advice (Trust but verify

) I got another trans I could care less about and ran an experiment.
First I removed all the gears to make it easier to photograph and grabbed a bad snap ring, not a new one.
I install them with the butt end into the splined shaft first.

- SNAP RING INSTALLATION MOTORRAD METHOD 3.JPG (33.51 KiB) Viewed 14174 times
I use the snap ring pliers to gag the snap ring open just enough to slip the snap ring onto the shaft.
Do not open the snap ring any more then is absolutely required to get it onto the shaft..
Re: KX500 BOTTOM END ASSEMBLY
Posted: Fri Apr 18, 2014 9:12 pm
by Sandblaster
Once I get the snap ring barely onto the shaft I use a socket or a piece of pipe to push it onto the shaft.
That way the snap ring stays square to the shaft and does not get bent open any further then is required to get it onto the shaft.

- SNAP RING INSTALLATION MOTORRAD METHOD 4.JPG (37.58 KiB) Viewed 14173 times
This works great until you need to jump up over another snap ring groove.
What I do is push the snap ring until it almost falls into the first snap ring groove, then I use my pliers to move it over the groove then I continue pushing the snap ring on with the socket or pipe.
Once you get it to where it needs to go I push it into the snap ring groove and let it snap shut.
Then I use a small standard screw driver to push it around to be sure it is correctly seated.
Typically the snap ring will spin in the snap ring groove when it is correctly seated.
All done right?
Nope.... Remember this picture?

- motorrad method.jpg (19.03 KiB) Viewed 14173 times
Re: KX500 BOTTOM END ASSEMBLY
Posted: Fri Apr 18, 2014 9:17 pm
by Sandblaster
You can get the snap rings much tighter by employing this last Motorrad suggestion..
Get yourself a good pair of Alligator Vice Grips like the one's in this picture.
With the butt end facing the inside of the jaws, apply light pressure.
You don't need to squeeze it hard, just good even pressure so that the butt ends of the snap ring are as close together as you can get them.
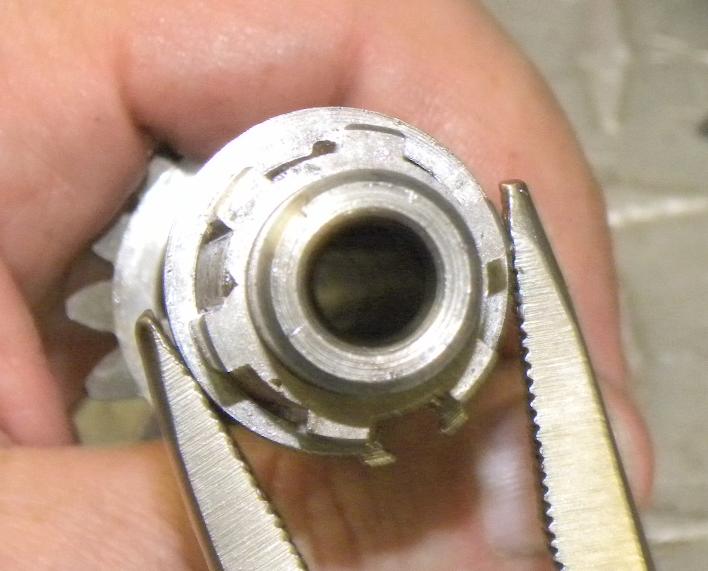
- SNAP RING INSTALLATION MOTORRAD METHOD 5.JPG (45.29 KiB) Viewed 14173 times
Re: KX500 BOTTOM END ASSEMBLY
Posted: Fri Apr 18, 2014 9:25 pm
by Sandblaster
Next, you need a brass punch and a ball peen hammer.
Since I couldn't find by brass punch or ball peen hammer I used what I could find..
Also, my alligator Vice Grips kept slipping off the snap ring (Because I need new ones) so I used a different style of vice grips that worked just fine.
A good but not overly aggressive couple of wacks in this position first.

- SNAP RING INSTALLATION MOTORRAD METHOD 6.JPG (39.9 KiB) Viewed 14173 times
Then moving 180 degrees from the butt of the snap ring give it a few more wacks.

- SNAP RING INSTALLATION MOTORRAD METHOD 7.JPG (33.36 KiB) Viewed 14173 times
Last, rotate again then give it a few more wacks.

- SNAP RING INSTALLATION MOTORRAD METHOD 8.JPG (24.13 KiB) Viewed 14173 times
Re: KX500 BOTTOM END ASSEMBLY
Posted: Fri Apr 18, 2014 9:27 pm
by Sandblaster
When you are all done, you should notice a difference of the tightness of the snap ring in the groove.

- SNAP RING INSTALLATION MOTORRAD METHOD 9.JPG (22.37 KiB) Viewed 14173 times
It won't be tighter then a gnats butt stretched over a rain barrel but it will be definitely tighter.
Re: KX500 BOTTOM END ASSEMBLY
Posted: Fri Apr 18, 2014 11:30 pm
by Sandblaster
All new bearings ...
Clean Clean Clean
- 2000 KX500 BOTTOM END ASSEMBLY.JPG (42.2 KiB) Viewed 14171 times
Dropped in the trans shafts

- 2000 KX500 BOTTOM END ASSEMBLY 1.JPG (51.27 KiB) Viewed 14171 times
Dropped in the shift drum, then the forks and alignment pins.

- 2000 KX500 BOTTOM END ASSEMBLY 2.JPG (61.26 KiB) Viewed 14171 times